
Showing posts with label cake. Show all posts

Thursday, 16 September 2010

Cake Bakery

A few months ago, my very good friend Lillah asked me if I would make her daughter Daisy's first birthday cake. Before this, my experience (almost entirely documented in this blog) with cake bakery, let alone decoration was entirely elementary.
The thing is, one of my favourite things in the WORLD to do is make things as gifts for other people. Whether it be jewelry, clothes or chutney, I want whatever I'm making to be the best I can possibly do, because I'm doing it with love.
So for weeks, I Googled images of daisies and cakes, hit up my ridiculously talented cousin Lucy for tips and supply sources and set about ordering plunger cutters, fondants, colours and dusts. I practiced making daisies out of fondant (instead of gum paste, because I didn't know any better) and made a few practice cakes, which my guys were happy to taste test for me.
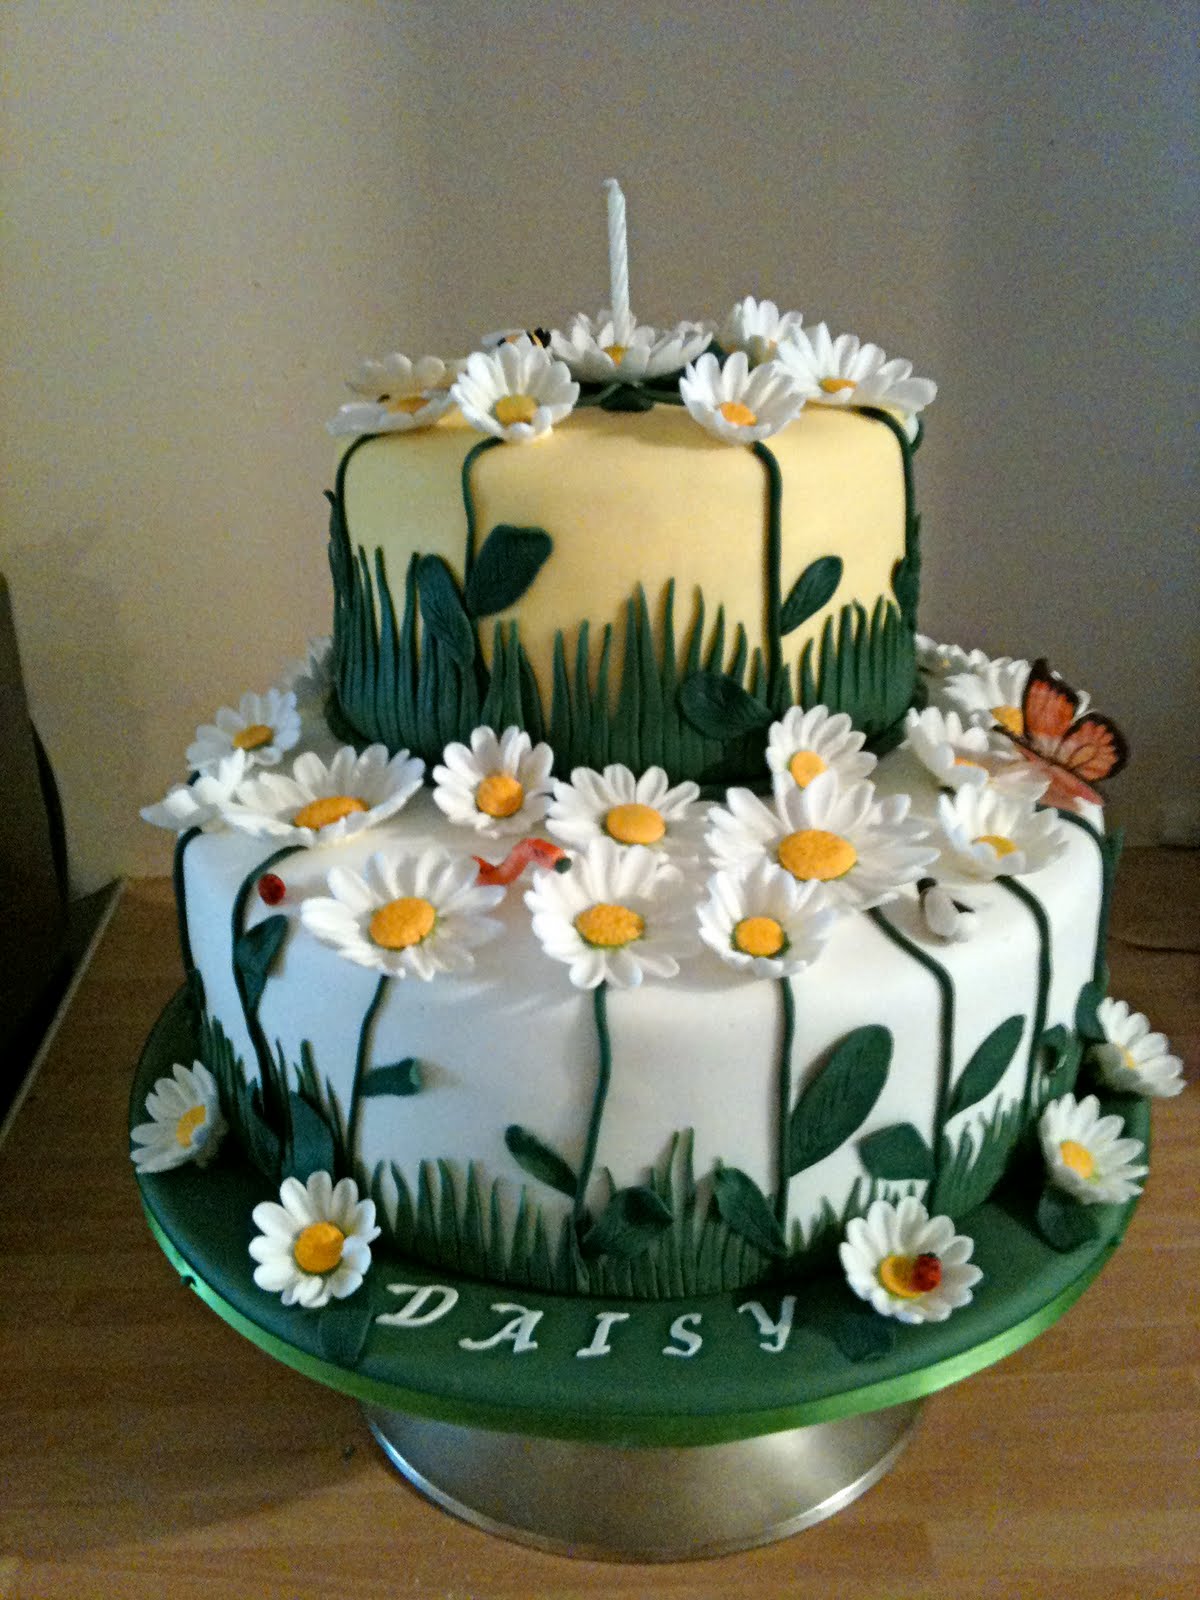
Daisy Cake 

I made the 12" bottom tier a lemon cake, drizzled with a lemon syrup, filled with lemon butter cream and raspberry jam.
The top 8" tier was a dairy-free vanilla cake with vanilla syrup, dairy-free vanilla butter cream and cherries and berries jam.

The dairy-free tier I felt was a little on the dry side, so I'm going to see if I can find a good alternative to the sunflower oil spread (Pure) I used. The other drawback to using the non-dairy spread was that it's not as firm as butter at room temperature, so it was harder to keep the fondant as flat and smooth for a long period while it warmed to room temp while I was decorating it.

This was my first properly decorated cake, so I gave myself a couple of days to work on it. I used recipes from Eric Lanlard's mediocre Glamour Cakes cookbook, which I tweaked to improve the flavour and moistness.

The daisies were made by using a PME plunger cutter, then rolling the petals with the end of a small paintbrush to give texture and depth. I made the centres with flattened and textured balls of yellow fondant. I should have taken some close-up pics so you could see the ladybugs, bees, butterfly and dragonfly, but I was too excited to think straight. Grrr! They were all made by hand, as was the grass and the daisy leaves.
In total, it took me about 16 hours to decorate the cake, not including the first batch of daisies that I ended up tossing, because I wasn't happy with them.
I immediately texted my cousin Sharon to ask if i could do her daughter Poppy's cake in November. I'm hooked. I never thought I would find myself this excited about cake decorating of all things
Daisy cupcakes

I made some simple vanilla cupcakes for my cousins Jenny and Sharon this past weekend and topped them off with some pink gerbera daisies and ladybugs. Of course I'm still every bit as obsessed with savoury cooking, but I'm really enjoying the novelty of this sweeter side.

It was my step mum Judy's birthday at the beginning of the month, so I made her this chocolate cake, layered with a coffee and hazelnut praline mousse, covered with a dark chocolate ganache and decorated with roses I made from dark chocolate with milk chocolate leaves.
I used the chocolate cake recipe from Eric Lanlard's book and it was depressingly dry. I will definitely be testing some other chocolate cake recipes in future, because it doesn't matter how pretty a cake is, if it tastes like loft insulation :-)
Dark Chocolate Roses Cake

Wednesday, 12 May 2010

Eating Apples

Being responsible for the diets of each of your family members is no small feat. Not only do you need to take everybody's likes and dislikes into consideration, you must also make sure that it's nutritionally balanced, varied and interesting, all while staying under budget. I think that we deserve free booze at the end of a grocery shop, as a reward for not giving up entirely or ending up in a clock tower with a semi-automatic weapon.  Free booze would work better for grocery stores than loyalty cards any day.

For me, one of the things I rarely get right is the quantity or selection of fruit that fills the bowl in the kitchen. If I buy two bunches of bananas, six apples and a kilo of grapes one week, All the apples and two bananas might get eaten, leaving the rest to soften and moulder on the counter.
The next week, two bunches of bananas might be gone in three days, while the apples turn dull and mealy. Oranges might be a hit for three weeks, only to inexplicably fall out of favour the very minute I buy three kilos on sale.
It's enough to drive a girl crazy!

One thing that IS nice about having all this left over fruit is that I can usually cook with it in one way or another. Cakes, sauces, crumbles and even chutneys are often thrown together when I know that they're past their eating best, which I think is sometimes why the guys leave it there in the first place. I mean what teenager wouldn't rather eat a piece of apple or banana cake instead of the whole fruit?

This cake is a very subtly spiced caramel apple upside down cake, with apple in the batter too. The spices are really only enough to enhance the mellow brown sugar flavour, rather than strong enough to really taste them, although if you like very cinnamony or nutmeggy apple, feel free to go crazy!

Caramel Apple Upside Down Cake
Serves 12, Takes 1 hour, 40 minutes +cooling

8 eating apples, like Gala or Braeburn (whichever is local or in season)
4 tbsp brown sugar
1 pinch salt
1/4 tsp cinnamon
1/4 tsp freshly grated nutmeg
about 8 cardamom seeds (out of their pods) crushed in a pestle and mortar
2 tbsp butter, softened
1tsp finely grated orange peel (optional if you don't have a fruit bowl full of oranges..)

250g (8.8oz)unsalted butter, softened
250g golden caster sugar
250g self raising flour (or plain flour with 1tsp baking powder)
1/2 tsp baking soda
4 eggs
1 tsp vanilla extract

Turn your oven on to 170C (340F) and butter and line the inside of a 22cm (9") square or round cake tin.
Peel, quarter and core 5 of the apples and slice into sorta half-moon shape slices.
Mix the softened butter, spices, orange peel and the pinch of salt together in a large, heat-proof bowl. Toss the apples into this mixture to coat well. I put my bowl into a wok with filled-halfway with boiling water to help melt the sugar, butter and spices well and coat the apples nicely. You don't have to worry about dissolving the sugar, that will happen in the oven.
Tip the apples and sugar mixture into the cake tin and press to make an even layer. If you want to be fancy, you could lay them out in a pretty pattern, but I was making this cake just before midnight, so there was no cussing way I was about to do that.

Peel the remaining 3 apples and grate the flesh off all the way down to the core, then put the grated apple in a colander and set aside for a few minutes while you:

Cream the 250g of butter and the caster sugar together for several minutes until pale and fluffy, then beat the eggs in one at a time, mixing each in well before adding the next.

Squeeze out as much of the excess liquid as you can from the grated apples, then add them to the butter/sugar/eggs mixture, stirring just enough to combine well.
This mixture will look rather curdled and unattractive, but fear not, it will be fine.
Sift in the flour and baking powder, stir well and then add the vanilla. Don't work the batter more than you need to, as you'll toughen the flour. Tip the batter in over the top of the apples and spread into an even layer, with a bit of a crater in the centre to compensate for rising.
Bake for 55-65 minutes, or until a skewer inserted into the centre comes out clean.
Allow to cool completely before turning out (unless you want hot brown syrup running everywhere...)


I sprinkled the top with a little coarse cane sugar before I cut it but to be honest, it didn't add anything, so I'd leave it off next time.
Apple Cake on FoodistaApple Cake

Sunday, 2 May 2010

Sweets Cookery Class

I've mentioned before that I've been teaching my stepson Christian (14) to cook on and off for the past seven years, during which, I have discovered that my teaching skills leave a lot to be desired.

You know how when you have guests and are cooking dinner and a guest says "can I help with anything?" and if you actually give them a task, it totally throws off your timing and overall cooking mojo? (Am I the only one?) Well I'm the same with teaching cooking.

Somehow, my groove gets totally thrown off, I forget important instructions and assume that somehow my stepson understands what I mean when I say "fold" or "drizzle" or "small dice" when I haven't even shown him yet. I get exasperated (inwardly) when he forgets to let the wok smoke before adding the oil or takes 45 minutes to peel a shrimp or two.

One thing that IS fairly easy to teach though, is baking. Maybe it's because there is little in the way of mise en place to get wrong and timing is much less of a worry than when you're trying to bring the various components of a dish together at the same time.
Not ONCE while making these brownies did I feel the need to say "Let me just do this part..." and Christian was so proud of the finished product.

I had made some sea salted butter caramel ice cream the day before specifically to serve with these brownies and they do go together a treat, but each would make an indulgent little sweet all on its own.

The brownie recipe is Lulu Grimes' from the back of this month's Olive Magazine, and is one of the best I've ever had. Knowing that I was going to be serving them with the caramel ice cream, I didn't feel the need to add chocolate chips or nuts to the mix, but there's no reason you couldn't.

Do the ice cream first, so that it's set when the brownies are almost cool.

Rich Chocolate Brownies with Sea Salted Butter Caramel Ice Cream
takes approx 4 hours, including cooling, makes 9 servings of each

For the ice cream:
2 cups double cream (heavy whipping cream)
1 1/2 cups whole milk
3/4 cups golden caster sugar
1 tsp vanilla
3 eggs
3 pinches, fine sea salt
2 tbsp unsalted butter

Put the sugar in an even layer in a heavy-bottomed skillet or saucepan over a moderate heat and leave it alone until you start to see the edges melting and going golden brown. Slowly stir the sugar with a wooden spoon for a minute or so, until all of the sugar has melted and is a deep, dark golden brown and bubbling away. Add the butter, a little at a time and stir well between each addition until just combined, then pour in the cream. The caramel will seize up at this point because of the addition of the cool liquid and the pan will bubble madly, but turn down the heat a little and stir rapidly for 6-7 minutes, until the caramel has dissolved into the cream, (this is where having a 14 year old around comes in handy) then turn off the heat.

Beat the eggs well in a bowl and add the vanilla, salt and then stir in the milk. Pour the thick caramel cream into the milk, whisking well as you go, then refrigerate this mixture for a couple of hours before churning.

Use an ice cream machine to churn your ice cream base for approximately 30 minutes (follow the manufacturer's instructions) then scrape into an air tight container and pop in the freezer for an hour or so to finish firming up.

For the brownies: (Thanks again Lulu!)

100g (3.5oz) unsalted butter, chopped
200g good quality dark chocolate, chopped (We used Valrhona, but Green and Black's 85% dark would be good)
4 free-range eggs
250g golden caster sugar
100g plain flour
1 tsp baking powder
30g cocoa

Heat the oven to 180C (350F) and line a 22cm square brownie tin* with baking parchment.
Melt the butter and chocolate together in a microwave or in a bowl set over a pan of gently simmering water then cool to room temperature.
Whisk together the eggs and sugar until pale and fluffy.
Fold the chocolate mixture into the egg mixture, then sift on the flour, baking powder and cocoa. Fold this in to give a fudgy batter and pour into your prepared brownie tin, smoothing out to create an even thickness.
Bake for 25-30 minutes**, or until the top is cracked but the middle is just set.
Cool completely before lifting out to cut.

*
We used a 20cm tin because I don't have a 22cm one. This meant our brownies were a little thicker, especially around the outside, where they rose and set a little more, which we rather liked.
**Better to err on the side of undercooked if you want fudgy brownies. Cooking for too long will produce a drier, more cake-like finished product.

Serve the brownies still ever so slightly warm with a scoop of the caramel ice cream on top.

I think tomorrow I'm going to make some hazelnut praline, which I'm going to powder and sprinkle on the top.

Killer Brownies on FoodistaKiller Brownies

Sunday, 11 April 2010

Grotty Old Bananas

How predictable is it that I make banana cake with old bananas? Almost as predictable as my husband and stepson intentionally leaving the bananas to go brown for exactly that reason.
I have made it every which-way possible by now, experimenting with different nuts, seeds and flours in an attempt to inject a little hippie health food into the mix.
I have settled on this way of doing this cake now. It's got a lovely mix of nuts and seeds, but is still unabashedly cakey, made with butter and white flour. I started adding very dark chocolate a while back and now I can't leave it out, as I think it really adds a nice counter to the banana's sweet perfume.This is a perfect afternoon tea or coffee companion and I think it would have done really well in the Seattle coffee shops I used to practically live in in the '90's....sigh, happy Mem'ries of Bauhaus and B&O Espresso....

It looks a bit like a health food, but I promise, it's super moist and sticky and absolutely scratches any "I need a piece of cake" itch.

Banana, Nut and Seed Cake with Dark Chocolate Chunks
Makes 12 slices

6 reeeallly, ugly-brown ripe bananas
175g (6oz) unsalted butter, softened
210g (7.5oz) golden caster sugar
105g (3.7oz) light brown sugar
330g (11.5oz) plain (all purpose) flour
50g (2 oz) ground almonds
1 tsp bicarbonate (baking) soda
1 1/2 tsp baking powder
1/2 tsp salt
3 large eggs
50g (2 oz) each: Flax seeds, walnut pieces, sunflower seeds and pumpkin seeds
100g (3.5oz) good 85% dark chocolate, cut into small chunks.

Turn your oven on to 150C (300F) and grease and line a 23cm (9") square cake tin (or round, whatever.)**
Cream together the butter and both sugars for 5-6 minutes, until really light and fluffy, then add the eggs, one at a time, making sure each is well incorporated before adding the next.
While that's happening, peel and mash the bananas, then add stir them into the butter/sugar/eggs mixture with the ground almonds. Sift together the flour, baking soda and baking powder, then stir into the mix until just combined, then do the same with the nuts, seeds and chocolate.
Tip this mixture into your prepared cake tin, making a little dent in the centre to compensate for rising. Bake for 1 hour 15 minutes- 1 hour 25, until golden brown and a skewer inserted into the thickest part comes out clean.
Cool on the counter for 15 minutes before turning out onto a wire rack to finish cooling at room temp before slicing into.

**To make this loaf-sized, multiply the ingredients by 2/3 and bake for 45 -55 minutes.
Moist Banana Cake on FoodistaMoist Banana Cake

Sunday, 14 March 2010

A Poppy-Filled Day

Yesterday was the BEST day! I went around to my cousin's house to visit his wife Sharon and daughter Poppy for a good chin-wag and a cuddle respectively. Sharon made some lovely sandwiches and we had several cups of tea (poppy had her bottle) and I brought along this lemon poppyseed cake. I had such a lovely time chatting and got some brilliant tickles and giggles in with Miss Poppy.


I took a slice over to my Dad and Stepmum's later on, which earned me an invitation out for a lovely dinner with them and some of their friends at their local Italian bistro Cafe Capriccio.
Read what you want into that, but yesterday I learned that if you take this cake to relatives' houses, you get yummy lunch, tea, filet mignon and plenty of red wine.
Aside from the baking and cooling time, this is super quick to make and is based loosely on the basic pound cake recipe.
Lemon Poppyseed cake with Very Lemony Butter Cream Icing
Serves 12, 30 minutes prep, 2 hours baking+cooling

300g Self Raising Flour (or plain flour with 1 1/2 tsp baking powder)
200g butter at room temp
75g sunflower or canola (rapeseed) oil
300g golden caster sugar
5 large eggs at room temp
1/2 tsp bicarbonate of soda
Juice of one lemon
finely grated zest of one lemon
1/2 tsp fine sea salt
4 tbsp blue poppy seeds

For the icing:
500g icing sugar
250g butter- cool but not cold
zest and juice of 1 1/2 lemons

Silver or gold dragees to decorate

Pre-heat the oven to 180C (350F) and prepare two 20cm x 4cm deep cake tins by lightly greasing with butter and lining the bottoms with a circle of baking paper.

Use a stand mixer or an electric hand mixer to beat together the sugar, oil and butter until very pale and creamy.
Add the eggs, one at a time to this mixture, beating each one well in before adding the next. Grate in the lemon zest, and beat while drizzling in the lemon juice slowly until all well-combined.
Stir in the the sea salt and the poppy seeds, then sift in the flour and bicarbonate of soda. Stir through well enough to combine the flour completely, but do not over mix, as you'll effect how well the cake will rise in the oven.
Bake in the oven on the same shelf (if you can fit them on the same shelf) for 40-minutes, or until the internal temp reaches 98 degrees C (210F) or a skewer inserted into the centre comes out completely clean.
Cool in the tins for 15 minutes, Then turn onto a wire rack to finish cooking completely before icing.

For the icing, just beat all the ingredients together with your electric mixer for a couple of minutes until very smooth, pale and creamy. It's best to use butter which is cool but not hard-cold. You should have a nice, smooth, spreadable icing now, but if you think it's too stiff, beat in another 1/2 the juice of a lemon.
If you need to and if the top is very rounded, use a serrated knife to flatten or even out the top of the cake you want to be the bottom half. You can do the same for the top cake if you want it to be perfectly flat.
Use a palette knife or spatula to spread a little of the icing on top of one of the cakes, then gently set the second one on top.
Pile the rest of the icing onto the top of the cake and push it out from the centre and down the sides, moving in a circular motion and smoothing as you go.
Top the cake with the silver dragees or a sprinkle of poppy seeds.

Now take to a lovely relative's house, have a lovely chat and cuddle.


Lemon Poppyseed Cake on FoodistaLemon Poppyseed Cake

Wednesday, 3 March 2010

Stickiness at Midnight!

Got your attention, didn't I?

Actually, this is a recipe for a gorgeous, sticky ginger cake rather than a more grow-up kind of nighttime naughtiness. I've titled the post Stickiness at Midnight because I decided to make this while we were watching Big Love, so it wasn't ready to eat until a couple of minutes after 12:00. Totally the best midnight snack possible.

When I was coming up through the British state school system during the '80s, our school dinners consisted of the typical grey roast beef, rubbery potatoes, congealed gravy and Spam fritters. Even the puddings were an abomination, consisting of pink (can somebody explain this one to me?) rice puddings and semolina. Every once in a while, we'd have a piece of warm golden syrup or ginger cake swimming in plastic custard which, as a kid, was like the pinnacle of sloppy decadence.

I have never stopped loving ginger cake, even though the ones found now in c0ffee shops and bakeries are a far tastier alternative to those institutional ones of my youth.
This recipe produces an incredibly sticky, light, yet dark cake with a sultry spiciness which is cut through by a drizzle of tart lemon icing. You can definitely leave the icing off and serve with warm vanilla custard for a grown-up version of old-fashioned English childhood.


Gooey Stem Ginger Cake With Lemon Drizzle
Takes 1 hour, 20 minutes +cooling Serves 8

250g self raising flour
1 tsp bicarbonate of soda
1 tbsp +1 tsp ground ginger
1 tsp ground cinnamon
1 tsp mixed spice
pinch of ground cloves
1/2 tsp ground white pepper
1/4 tsp salt
125g cold, unsalted butter, cut into 1cm cubes
125g dark muscovado sugar
125g treacle (molasses)
125g golden syrup or corn syrup
2 tbsp syrup from the step ginger jar
120g stem ginger, finely grated
225ml whole milk
1 egg

For the icing:
70g icing (confectioners') sugar
2 tbsp fresh lemon juice
2 tsp finely grated lemon zest

Preheat the oven to 160C/320F for a fan oven or 180C/375F Conventional Put a Pyrex bowl full of boiling water on the bottom of the oven
Grease and line an 23cm/9" round or square cake tin or a loaf tin
Sift together the flour, bicarbonate of soda, salt and spices and add to the bowl of a food processor, along with the butter. Pulse this lot together for about 30 seconds until you have the consistency of bread crumbs. This can also be done by hand in a bowl using your fingertips.
In a small saucepan, heat the treacle, golden syrup, brown sugar and milk, stirring periodically until the sugar has dissolved and the mixture is beginning to boil. Remove from the heat and allow to cool slightly.
Mix the grated ginger into the flour mixture, then pour the warm syrup mixture over the flour, stirring as you go. You'll notice a lot of bubbles as the hot sugar hits the bicarb, so you want to move fairly quickly, as this is going to add quite a lot of lift to the final cake and the clock is ticking. When the mixture is nearly completely combined, stir in the syrup from the stem ginger jar and the egg. Stir for a few seconds more until the mixture is mostly smooth, then pour into your prepared cake tin and bake on the middle shelf for 50-60 minutes.
The best way to check for doneness is to test the internal temp. You want about 98C/210F
but if you don't have a probe thermometer, a skewer or toothpick inserted into the centre should come out mostly clean.

Allow to cool almost all the way before turning out onto a plate and drizzling with the icing.

To make the drizzle, have the icing sugar in a small bowl and add the half of the lemon juice, stirring and adding more a few drops at a time until you have a just-pourable consistency. Add the lemon zest and stir through, then pour or spoon over the still ever so slightly warm ginger cake. Serve immediately or at room temp.

If you plan on freezing, don't ice until you have defrosted it. Well-wrapped this cake should last a few weeks in the freezer (but seriously, who freezes cake?)

Ginger Cake on FoodistaGinger Cake